라즈베리파이를 설치하는데 꽤 복잡하지만 크게 3 가지의 단계로 나눌 수 있습니다.
Installing Raspberry Pi process is pretty complicated but it can be divided into 4 big phases.
1. 라즈베리파이 운영체제를 다운 받고 SD카드에 쓰기
1. Download Raspberry Pi OS and write on SD card
2. 라즈베리파이를 인터넷과 연결하고 아이피 주소를 찾아 Putty와 연결 시키는 것
2. Connect Raspberry Pi with internet to find IP address and connect with Putty
3. Putty에 연결한 라즈베리파이의 설정을 조작해 VNC를 통해서 GUI로 실행시키는 것
3. Operating GUI with VNC by manipulating the setting of Raspberry Pi which is connected with Putty.
준비물: 라즈베리파이, 공유기, 공유기와 연결된 랜선, 전원 USB
Preparations: Raspberry Pie, router, LAN cable connected with Router, Power USB fort
++ 별 표시(*)가 있는 문장 또는 문단은 혹자가 했던 바보 같은 실수나 몰랐던 사실들이므로 "멍청한 녀석ㅋ" 하면서 조심하면서 한번 쯤 읽고 넘어갔으면 한다.
++ Sentences or paragraph with star mark(*) is stupid mistake or unknown facts that the author did.
So, think me "dumb lol" and read them once carefully to not make any mistakes while installing.
1. 라즈베리파이 운영체제를 다운 받고 SD카드에 쓰기
1. Download Raspberry Pi Os and wirte on SD card
이 과정을 수행하는 방법은 두 가지가 있지만 원리는 동일하다. 단지 SD카드에 어떤 프로그램을 이용해 쓰는 것이 다를 뿐이다.
There are two ways to operate this process, but the principle is identical. The only difference is what program we use to write on SD card.
라즈베리파이 이메저를 이용한 설치 방법이다. 비교적 쉽고 귀찮은 작업이 덜해서 혹자는 이 방법을 추천한다
First, installing method using Raspberry Pi Imager. I recommend this method because this way is easy and has less bothering works.
하단의 라즈베리파이 사이트에 접속하면,
When you get into this Raspberry Pi site below,
Raspberry Pi OS – Raspberry Pi
The Raspberry Pi is a tiny and affordable computer that you can use to learn programming through fun, practical projects. Join the global Raspberry Pi community.
www.raspberrypi.org

조금 내리다 보면 위 그림과 같은 화면이 뜨는데 영어로 알 수 있다 싶이 이 프로그램이 라즈베리파이 이메저이다.
When you scroll down a little bit, You can see Raspberry Pi Imager screen as you can understand in English.
자신의 컴퓨터의 운영 체제에 맞게 파일을 다운로드 하면 된다.
Download your correct file refers to your Operating System.
그러면 아래 그림과 같은 아이콘의 설치 파일이 뜨는데 이를 실행시켜주면 된다.
Then you can see this icon of the installation file, just open this file.

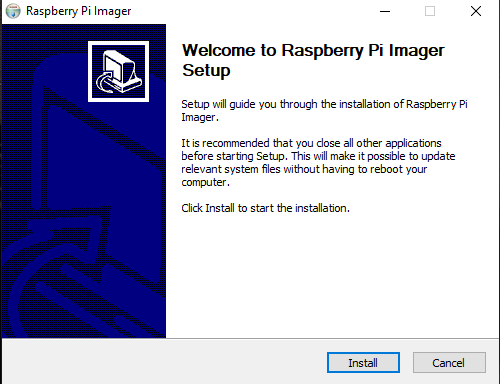
"Install"을 누르고 설치할 때까지 기다리면 된다. 컴퓨터 성능에 따라 다르겠지만 거의 30초도 걸리지 않는다
Press "Install" and wait until it finishes the installation. It could be different by computer, but, in my case, It takes less than 30 seconds.
설치가 끝나고 자동으로 실행하다면 다음과 같은 화면이 뜬다
After installation and if starts automatically, you can see this screen.

우리가 책을 읽듯이 왼쪽에서 오른쪽으로 진행하면 된다. 먼저 운영체제(Operating System)을 고르라고 CHOOSE OS
라는 버튼이 보일 텐데 이 버튼을 누르면
As we read the book, progress left to right. First, you can see "CHOOSE OS" to choose the operating system, and if you click it,

이와 같은 화면을 볼 수 있다. 여러 가지가 있어서 복잡하겠지만 일반적인 라즈베리파이를 실행할 것이므로 맨 위의
Raspberry Pi OS(32-bit)를 고르면 된다.
You can see a screen like above. You can be confused because there are many things. However, just choose Raspberry Pi OS(32-bit) when you use general Raspberry Pi.
운영 체제를 골랐다면 다음은 이 운영 체제를 쓸 저장 장치를 지정하는 단계이다.
If you chose OS, the next step is designating the memory to write this OS.
다음 단계로 넘어가기 전에 이제 SD카드를 SD 카드 리딩이 가능한 USB에 꼽고 USB를 노트북이나 컴퓨터에 연결시켜 주어야 한다.
Before progressing to the next step. Now combine SD card with USB which can read the SD card and plug USB with laptop or computer.
USB를 꽂았다면 이제 중앙의 CHOOSE SD CARD 버튼을 누르자
If you finished plugging in USB, Let's click the button "CHOOSE SD CARD"

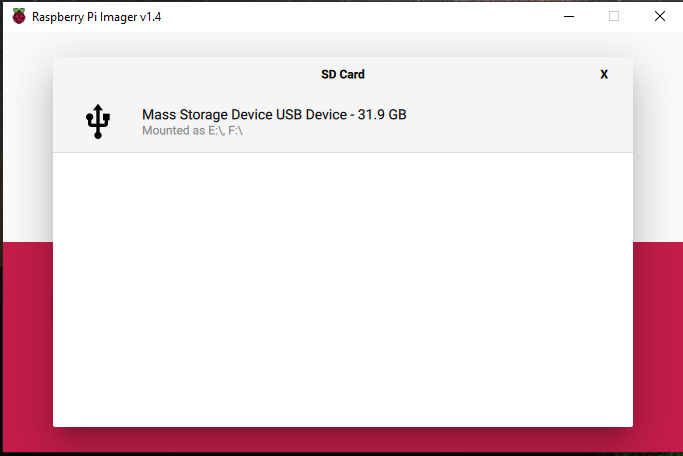
만약 SD 카드가 잘 연결 되었다면 SD 카드가 Imager에 읽혀 다음과 같이 뜰 것이다.
If sd card is well connected, Screen will show you like the above image that SD card is read by Imager.
다른 SD 카드가 없는 한 연결한 SD 카드를 고르면,
Unless there is no other SD card, choose the SD card which is connected.

처음에 검붉은 색 버튼으로 되어 있던 WRITE 버튼이 흰색으로 활성화 되어 화면에 뜰 것이다.
The "WRITE" button will turn white when it was dark red in the beginning.
"WRITE" 버튼을 누르면 로딩 바가 뜨면서 해당 SD 카드에 OS를 써내린다. 이 과정 역시 컴퓨터의 성능에 따라 다르겠지만 혹자는 약 5분에서 7분 정도 걸렸다. 기다리는 동안 라면 하나 끓여 놓는 건 어떨까?
When you click "WRITE" button, the Loading bar appears, and write the OS on the target SD card. Also, This progress takes differently by computers, but I took 3 minutes to 5 minutes. While waiting, why don't you boil some instant Ramen?
SD 카드에 OS가 쓰여지는게 끝났다면 끝났다는 문구와 함께 프로그램이 종료된다. 이제 USB를 노트북에서 뽑고 SD 카드를 뽑아 라즈베리파이에 연결하면 된다. 하지만 여기서 그냥 뽑지말고 하드웨어 및 장치 안전제거를 통해 제거해주자. 왜 그런지를 모르겠지만 파일이 손상될 수 있다고 찾아 읽었다. 혹자는 그런 것도 모르고 여태까지 그냥 뽑았는데..그냥 그렇다면 그런가 보다..
If progress finished, the program closes with the phrase "Progress is finished" Now, unplug the USB from the laptop, put SD card to Raspberry Pi machine. But just don't unplug it, unplug with "Saftey Remove Hardware and Device". I don't know the reason, But I read it can damage the file. I have been unplugged without that..whatever..
* 혹자는 SD 카드를 USB에 꽂은 상태로 USB 포트에 꽂아 놓고 왜 안되는지 고민했었다. 인터넷 서핑을 하고 나서야 라즈베리 파이 몸체 자체에 SD 카드를 꽂을 수 있다는 것을 알았다. 지금 생각하면 참 멍청했다.
* I put a USB on USB fort with SD card is plugged at USB and worried about why it doesn't work. I realized that I could put SD card on Raspberry Pi body directly after internet searching. I was so stupid, now I think.
2. 라즈베리파이를 인터넷과 연결해 아이피 주소를 찾아 Putty와 연결 시키기
2. Connect Raspberry Pi with internet to find IP address and connect with Putty
제목에도 나와 있다 싶이 Putty라는 프로그램을 이용할 겁니다. Putty는 가상 단말기 프로그램이라고 하는데 쉽게 말해서 개인용 PC로 특정 서버에 접속하기 위해 가상의 단말기를 만들어 접속하는 개념입니다.
As you can see in the title, We'll use "Putty" program. Putty is a virtual terminal program. Easily, making virtual terminal to connect to "a specific server" by "PC".
이 과정에서 제일 중요한 것은 "노트북 또는 컴퓨터와 동일한 공유기에 연결된 랜선"을 라즈베리파이와 연결하는 것입니다.
The most important is connecting Raspberry Pi with a LAN cable which connected with the same router with a laptop or computer
지금 노트북과 같은 공유기의 랜선을 라즈베리 파이의 랜포트에 꽂아주어야 합니다.
Now, put LAN cable, connected with same router with laptop, to Raspberry Pi's LAN port.
먼저 윈도우 10 기준 바탕화면 왼쪽 하단에 돋보기 모양과 함께 검색창이 있습니다. 이 검색창에 'cmd'라고 검색합니다.
You can see the search bar with a magnifier if you use Windows 10. Type 'cmd' and press Enter.

그러면 그림과 같은 검은 창과 함께 하얀 바가 깜빡거릴 겁니다. 그 창에
Then you can see a black window with white bar blinking. Type
ipconfig
라고 쳐줍시다.
on that black window.
그러면 현재 노트북 또는 컴퓨터와 연결된 통신 상태를 보여주는데
Then, it shows the communication status connected with the laptop or desktop
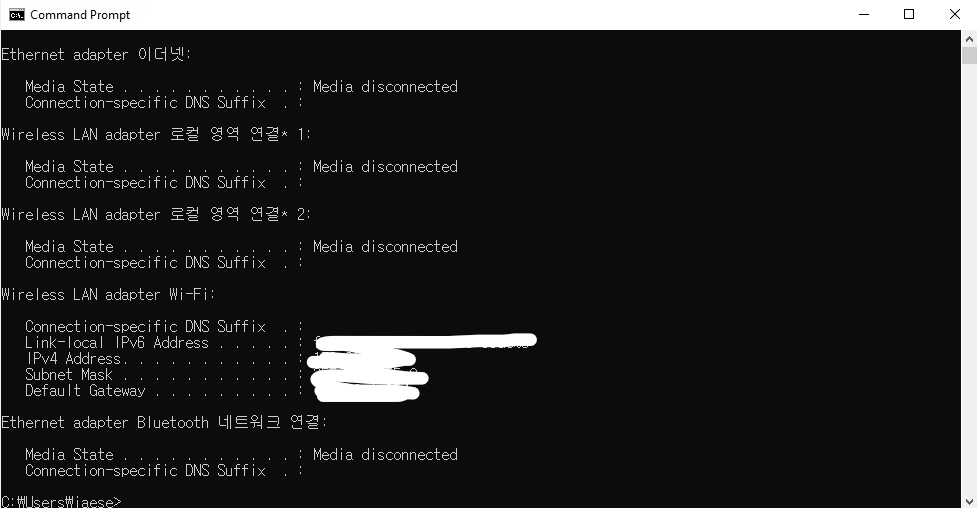
아래와 같이 다른 것들은 연결되어 있지 않지만 연결되어 새로운 정보가 뜨는 문단이 있습니다,
There is a paragraph which shows new information connected with the internet while others didn't.
혹자의 경우에는 와이파이를 이용한 무선랜으로 인터넷에 연결되어 있었습니다.
In my case, my laptop was connected with a wireless LAN adapter with Wi-fi
여기서 알아야 할 것은 흰색 칠해져 있는 부분의 맨 아래인 Default Gateway(기본 게이트웨이)의 배열 입니다.
What you should know is the number array of the bottom which is colored with a white called "Default Gateway"
저 배열을 기억하거나 따로 메모해서 해두셔야 합니다.
Memorize the array or memo it separately.
이제 브라우저(인터넷 익스플로어, 크롬, 네이버 웨일, 사파리, 파이어 폭스 등)에 접속해서 적어 놓은 문자의 배열을 주소창에 점과 함께 타이핑 한 후 엔터를 눌러줍시다.
Now, open a browser like Internet Explorer, Chrome, Naver Whale, Safari, Firefox .etc, and write the array with a dot on the domain bar. Then, press Enter.
그러면 공유기의 관리화면이 뜨는데 아이디와 비밀번호를 입력하라고 합니다. 아이디와 비밀번호를 이전에 변경하지 않는 이상 초기 아이디와 비밀 번호는 인터넷에 검색하면 나오므로 이를 검색해서 로그인을 해줍시다.
If you do so, you can see the administrate screen of the router, they require ID and password. Unless you changed them before, the initial ID and password are open on the internet. So, find out them and login to administrate screen.
화면에 들어가게 되면 회사마다 다를 수도 있지만 연결되어 있는 단말기에 할당된 ip 주소가 뜹니다.
Once you log in, you can see the object button which can see each IP address of the connected terminal. It could be different by the company.

혹자는 단순히 LAN1에 연결되었다고 나왔지만 다른 통신사 화면에서는 제조사가 함께 나온다고합니다. 제조사가 나오는 경우는 Raspberry Pi 라고 한 눈에 접속했는지 알수 있게 바로 뜬다고 합니다.
I just could see that connected with "LAN1", but in other communication company, you may see the manufacturing company with IP address. In the case of the manufacturing company's name marks, the "Raspberry Pi" will appear that you can realize it at once.
이제 라즈베리 파이에 할당된 주소를 기억해야 합니다. 앞으로 설명할 라즈베리파이의 주소를 123.45.6.789 라고 가정합시다.
Now, remember the IP address which is allocated at Raspberry Pi. Suppose the IP address of Raspberry Pi that I will explain is 123.45.6.789
123.45.6.789
라즈베리파이의 주소를 알아 냈으니 이제 이전에 언급한 Putty를 설치하고 이용할 것입니다.
We got the address of Raspberry Pi. So, let's install and use Putty that I mentioned at the beginning of this chapter.
www.chiark.greenend.org.uk/~sgtatham/putty/latest.html
Download PuTTY: latest release (0.74)
This page contains download links for the latest released version of PuTTY. Currently this is 0.74, released on 2020-06-27. When new releases come out, this page will update to contain the latest, so this is a good page to bookmark or link to. Alternativel
www.chiark.greenend.org.uk
위에 올려 놓은 Putty의 다운로드 사이트로 가서 자신의 노트북이나 컴퓨터의 운영체제에 해당하는 설치파일을 다운 받고 설치하면 됩니다.
Go to the download site of Putty, download, and install the installation file corresponding to your OS of laptop or desktop.
설치파일은 다음과 같은 화면이 뜰겁니다
The installation file will show like this screen.

설치를 완료하고 Putty를 실행 시키면 다음과 같은 창이 뜹니다.
After installation, You can see this window when you operate Putty.
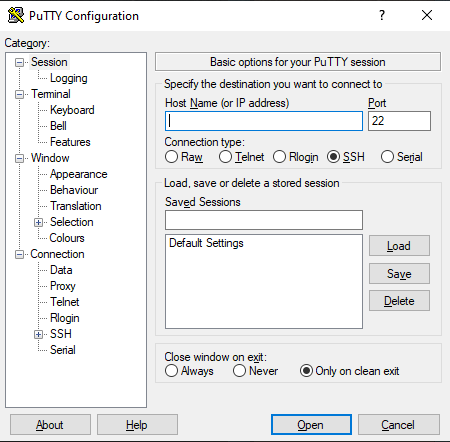
아까 기억해 두었던 라즈베리파이의 아이피 주소를 사진의 검색바 띄워져 있는 곳에 치면 됩니다.
Put the IP address of Raspberry that we memorized on the white bar that the curser is marked.
이렇게 말이죠
Like this

그리고 아무것도 건들지 말고 Open 버튼을 누르시면 됩니다.
And, touch noting but press the "Open" button.
이어 Putty가 해당하는 아이피에 접속합니다.
Next, Putty will connect to the target IP address

그리고 다음과 같이 로그인을 하라는 문구가 뜹니다.
The window will show you to ask for a log-in.
라즈베리파이의 최초의 기본 설정 아이디와 비밀번호는 pi와 raspberry 입니다.
The initial ID & password of Raspberry Pi is Pi and raspberry
ID: pi
Password: raspberry
먼저 아이디인 pi를 키보드를 통해 치고
First, type "pi" the ID by the keyboard

비밀번호인 raspberry를 치면
And type "raspberry", the password

안뜹니다. 거짓말이 아니고 화면에 출력이 안됩니다. 저도 처음에 오류가 생긴 줄 알았습니다.
무슨 일이 일어난 걸까요?
YOU CAN'T SEE THEM. Not lying, literally, you can't see the output on that window. At first, I thought that an error happened. What happened?
위의 GIF 파일을 보시면 아시겠지만 아이디와는 다르게 비밀번호는 입력받되 몇 개를 입력받았는지 문자를 화면에 출력하지 않습니다.
As you can see in the GIF file above, unlike ID, the password gets an input but doesn't output how many words that It got.
하지만 라즈베리를 입력하고 엔터를 누르면 정상적으로 라즈베리파이에 접속하게 됩니다.
However, when you input "raspberry" and press enter, you will connect to Raspberry Pi normally.
저도 평소에 비밀번호를 치면 나오는 ● 모양이나 * 모양이 나오지 않아서 당황스러웠습니다.
I was disconcerted that Round Character(●) or Star Character(*) didn't appear when I type my password.
위와 같은 단계를 거치고 나면 그제서야 라즈베리에게 터미널을 통해 명령을 내릴 수 있게 됩니다.
After these phases, You can order Raspberry directly with the terminal.
3. Putty에 연결한 라즈베리파이의 설정을 조작해 VNC를 통해서 GUI로 실행시키는 것
3. Operating GUI with VNC by manipulating the setting of Raspberry Pi which is connected with Putty.

아래의 명령어를 터미널에 타이핑하시고 엔터를 눌러주세요
Type following order sentence and press "Enter"
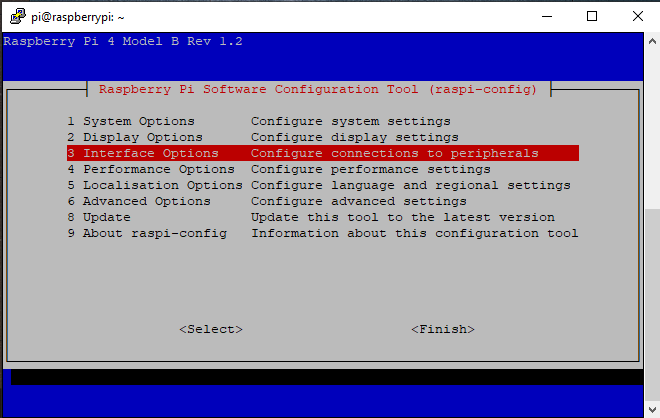
sudo rapsbi-config

그러면 위 이미지와 같은 옛 컴퓨터에서 볼만한 화면들이 뜰겁니다.
Then, you can see the screen which may have been seen in the old computers
순서에 맞추어 방향키를 움직여 해당 위치까지 이동해주세요
Move to certation location with using arrow keys in order
1 System Options -> 3 Interface Options -> P3 VNC

P3 PNC 에서 엔터를 누르면 아래와 같은 화면이 뜨게 됩니다
You can see this following screen when pressing Enter at "P3 PNC"

VNC 서버를 통한 접속을 허용해 주어야 함으로 < YES>가 선택된 상태에서 눌러주세요
Connnection with VNC sever is essential, so press Enter on <YES> status

제대로 실행되면 VNC가 허용되었다는 문장과 함께 명령어를 처음 입력했을 떄의 화면으로 돌아옵니다
If it excute normally, It shows that VNC sever is enable and return to the first screen.
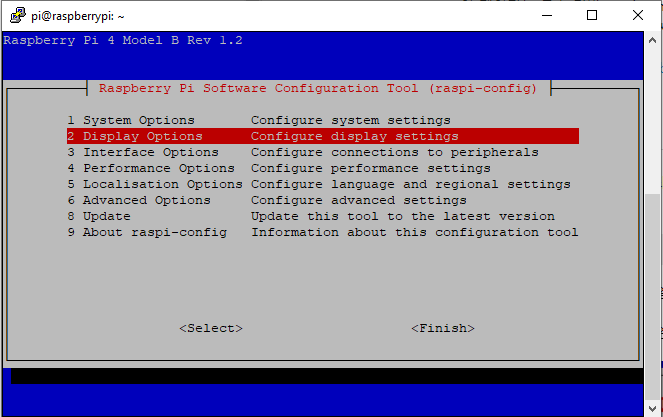
그리고 다시 돌아와서는 해상도(Resolution) 조정을 해줄 겁니다
And, next, We will make Resolution adjustment
아까와 같이 순서에 맞추어서 해상도에 접근해주세요
Access Resolution section in order like before process.
2 Display Option -> D1 Resolution


자신의 컴퓨터의 해상도에 맞게 골라 선택해주세요
choose and select appropriate resolution
+ 자신의 해상도에 맞게 설정을 했는데도 작동하지 않는 경우가 있습니다. 이런 경우는 모니터의 실제 화면보다 낮은 해상도로 설정하여 시도해 주세요
+ Sometimes it doesn't work even if you chose the right resolution. In this case, select LOW resolution than your computer mointer

해상도가 설정되었다는 화면과 함께 다시 원래의 화면으로 돌아올겁니다
Once again, you will return to the first screen while your resolution is selected

이제 설정은 끝났습니다. 재부팅한 후 VNC를 통해 라즈베리파이를 실행시키면 됩니다
Now setting is done, after reboot, execute raspberry pi by VNC
화살표를 쭉 내려서 <Finsh>에 도착해 엔터를 눌러 빠져나와주세요
Keep arrow down and press Enter when it reach <Finish>

터미널 창에
Type
sudo reboot명령어를 입력해 재부팅을 시켜주면 됩니다
order and enter to reboot

그럼 위 창과 같이 네트워크 연결이 강제로 끊겼다는 창이 뜨는데 OK를 눌러 주시면 됩니다.
Then, just press OK when the connection is terminated window appears.
아까 VNC의 네트워크 허용을 해주었으므로 VNC를 접속해주면 됩니다
Lastly, We enabled the connection of VNC network so we can connect with that.
https://www.realvnc.com/en/connect/download/viewer/
Download VNC Viewer | VNC® Connect
VNC® Connect consists of VNC® Viewer and VNC® Server Download VNC® Viewer to the device you want to control from, below. Make sure you've installed VNC® Server on the computer you want to control. Frequently asked questions How do I install VNC® View
www.realvnc.com

VNC 프로그램을 다운 받아 실행시켜 줍니다
Download and start VNC program

아쉽게도 영어, 독일어, 에스파냐어, 프랑스어, 포르투갈어 밖에 지원하지 않네요
Unfortunately, It only supports English, German, Spanish, French, and Portugues

계속 설치를 진행하시면 됩니다. 이후 바탕화면에 바로가기를 설정했다면 바로 프로그램을 실행시켜 줍니다
Keep going on installation. After installation use shortcuts to start program at Desktop.

프로그램을 실행시키고 정상적이라면 검은 화면의 창이 하나 뜰겁니다. 그게 연결되어 있는 라즈베리 파이인 것이죠
If it is normal, you can see the black small screen. That is the raspberrty pi with connected

아이디와 비밀번호를 입력하라고 하는데 아이디는 pi, 비밀번호는 raspberry입니다. 입력 후 OK를 누르면
It requests ID and password, as you know ID is pi, the password is raspberry. Type it and press OK

태양이 지는 석양의 모습이 보이며 라즈베리파이를 실행할 수 있습니다!
You can see the Raspberry Pi screen with sunset!
+ 후기
작년에 라즈베리 파이를 실행하면서 온갖 사이트를 찾아보면서 고생했는데 결국 찾아냈습니다. 하지만 이곳 저곳에서 나누어져 설명하느라 하나로 정리된 글이 필요하다고 생각했습니다. 한국어로 정리된 곳이 없어서 결국 스스로 스크린샷을 찍어 훗날의 내가 보더라도 다시 쉽게 할 수 있게 정리하게 되었습니다. 부족한 영어 실력과 설치 방법이지만 누구 한 사람이라도 이 글을 보고 보다 쉽게 라즈베리파이를 설치했으면 합니다. 감사합니다
+ Review
Last year, I had hard work to install Raspberry Pi by surfing the whole internet and I DID it. But I felt one summarized post is needed. There were no Korean posts so I organized myself by capturing screenshots even if I see this post in the future. It was incorrect English and an insufficient explanation but I hope this post helps anyone who tries to install Raspberry pi. Thanks.
+ 21. 11. 07 중간에 군대를 가느라 글을 다 마치지 못했는데 휴가를 나온 이제서야 끝내내요..속이 후련합니다
+ 11. 07. 21 I couldn't finish this post because of my duty in the military. But now I finished the post while on vacation...I feel so much better...
+++ 질문과 오류 지적은 언제나 환영입니다!
+++ Questions and error pointing is always welcome!